ADF-Copy is a small hardware i developed which uses a Teensy 3.2 microcontroller to read and write non copy protected Amiga disks with an out of the box PC 3.5″ Floppy drive connected to the microcontroller which can be build with a few jumper wires on a breadboard with no additional component. The low level stuff is handled in the microcontroller which is controlled by a Java application.
Additionally starting with Firmware 0.625 and Windows 10 the Amiga Disk can be accessed like an USB Thumb drive.
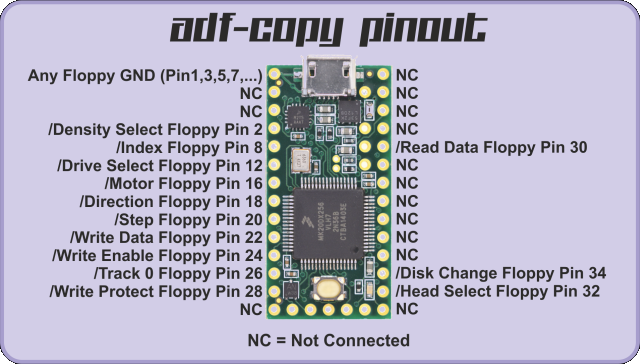
The firmware for the microcontroller supports and autodetects two different pinouts, the older one is easier to build on a breadboard, while the new one is rerouted for a PCB i designed.

The schematic:

The connections K1, K2, K3 are for future expansion and not necessary at the moment. The second USB connector is for the power supply of the floppy drive when powered over usb. This is the schematic according to the new pinout optimized for the PCB.
Contact me if you want to buy a PCB.
nickslabor (at) niteto.de
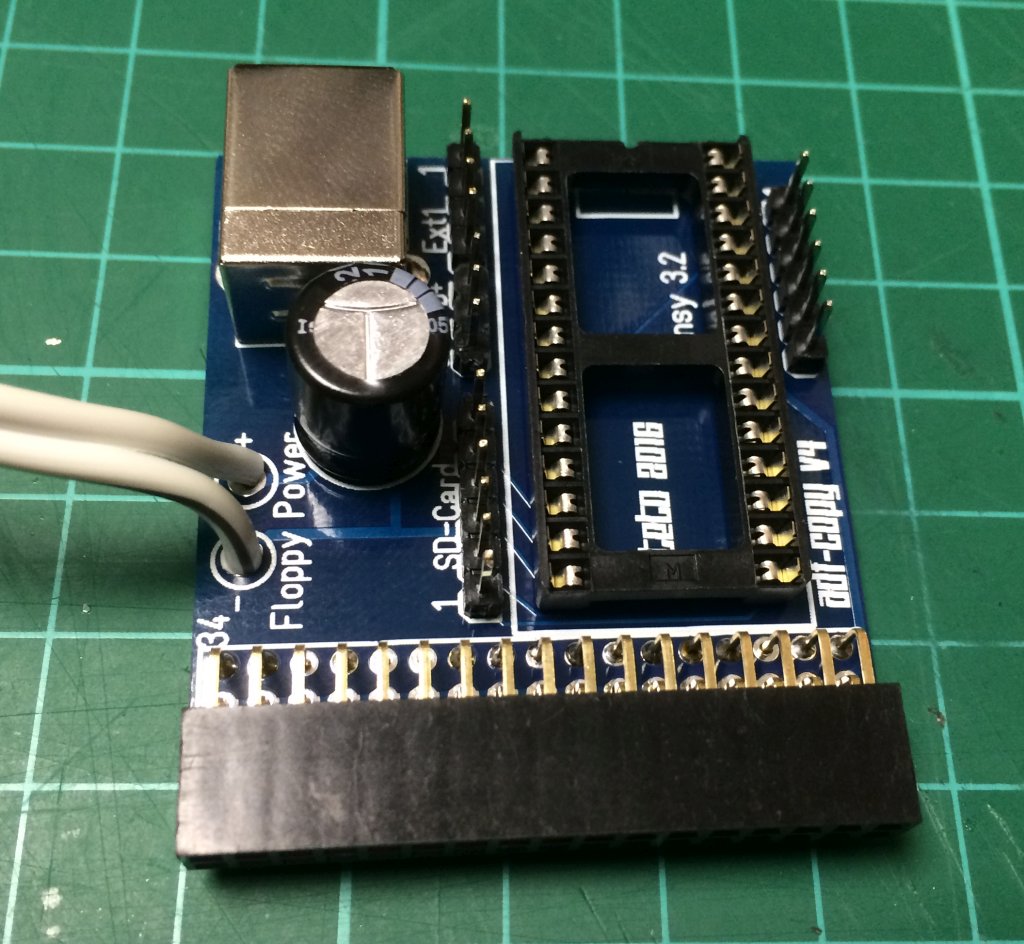
The smaller second revision of the PCB.
It is important that the Teensy is a 3.2 version, because other versions are not 5V tolerant and might be destroyed when getting 5V on the input pins. I also recommend using a capacitor of 800-1000µF to buffer the floppy power when using a USB port to power the floppy because the peaks can reach 700mAh and the USB Port can only deliver 500mAh by specification.
The Teensy communicates via USB Serial with the PC and gets it commands by the ADF-Copy Frontend. The Frontend needs a working Java Installation and the Teensy driver installation. The jar file of the Frontend works currently on Windows XP-10, Linux and Raspberry Pi, it took me a while to get that working in one file.
I developed the Frontend with Processing 3.2 and the G4P library which handles the GUI. The GUI is in english, because most things sounded wierd in german :)
 The functions of the Frontend are mostly self explanatory, but for the completeness, those are the functions:
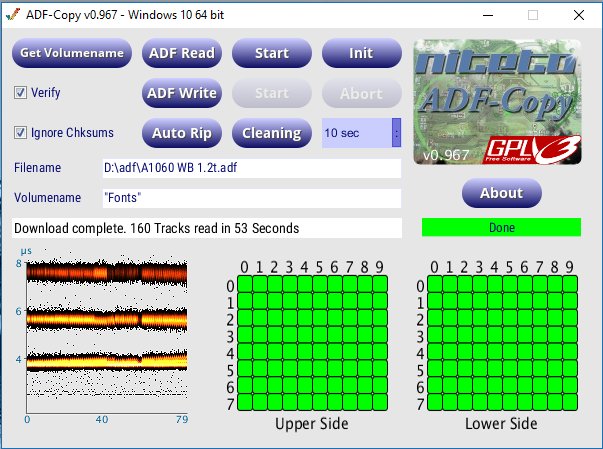
Get Volumename: reads the volumename of the inserted Disk, if the disk is in customformat like a bootable game, it displays „NDOS“. NDOS is also displayed when the disk is unreadable.
ADF Read: lets you select the name and where to save the file, if you used Get Volumename a filename will be suggested. After selecting a filename Start becomes available.
Start: Starts reading the disk and saves also a log file containing weak tracks and a flux diagram as jpg in the same folder as the image.
Init: Initialises the drive and moves the head to track 0.
Verify On: should be on for writing disks, unless you don’t care and just want to erase disks with an empty image.
Ignore Checksum: Ignores checksums in the blockheader of amiga disks, some bootable disks used wrong checksums to stop users from using the built-in diskcopy of workbench.
ADF Write: lets you choose which adf image to write on the disk. After selecting an image the Start button next to it becomes availabe.
Start: starts the write process, make sure the write protect of the disk is off.
Abort: aborts the current process.
Cleaning Mode: move the drive head to several tracks, might be useful with a special cleaning disk. The duration can be selected in the dropdown next to it.
Auto Rip: this mode requests a folder to save to and starts auto ripping disks, the image name is automatically generated by volumelabel and a hexadecimal time stamp, NDOS Disks will be named NDOS+Timestamp. The process starts immidiately with the inserted disk, after reading the disk the user is prompted to insert the next disk. To stop, use the Abort button.
 The diagram in the lower left shows the timing distribution of the flux transitions, A smaller band means higher quality, usually you can see if a disk was written by a professional duplicator or by a normal amiga drive which shows a wider band. The black dots in the 2µs range are usually trashbits from the trackgap, on some disks you can see a displacement of the bands from track 40-79, whichs means Write Precompensation was used. WritePreComp wasnt implemented in earlier versions of the amiga OS, i think they introduced WritePreComp in Kickstart 2.0. Fine vertical red lines mean there where several tries needed to read the track and will show up in the log file as weak tracks.
The About Button shows details about Copyright and License, everything is released unter Gnu Public License V3.
The whole project has very few checks for Errors, so be careful and don’t wreak your super rare original disks, however, the writeprotect switch is implemented in the floppy hardware and cannot be overwritten by software failure. Since this is a hobby project, there are no warranties at all.
The software and sourcecodes can be downloaded here:
I’m selling blank PCBs, just send me an e-mail: nickslabor (at) niteto.de